Step-by-Step Guide: Setting Up Meta Pixel and Conversions API for Shopify in 2026
Master your tracking with this Meta Pixel Shopify tutorial 2026. Learn to set up Shopify Conversions API and Meta Events Manager for optimal ad performance.
In 2026, data isn't just an asset for your ecommerce store; it is the fuel that powers the machine. With privacy regulations tightening and AI-driven bidding becoming the standard, your ability to feed clean, server-side data to Meta Ads Manager is what separates the scaling brands from those struggling to break even. This guide provides a technical deep-dive into the Meta Pixel and Conversions API (CAPI) requirements specifically for Shopify stores, ensuring your tracking is bulletproof. While an AI ecommerce employee like Stormy AI handles the daily monitoring and ad reporting in the background, you need this foundation to be rock-solid.
The Tracking Landscape in 2026
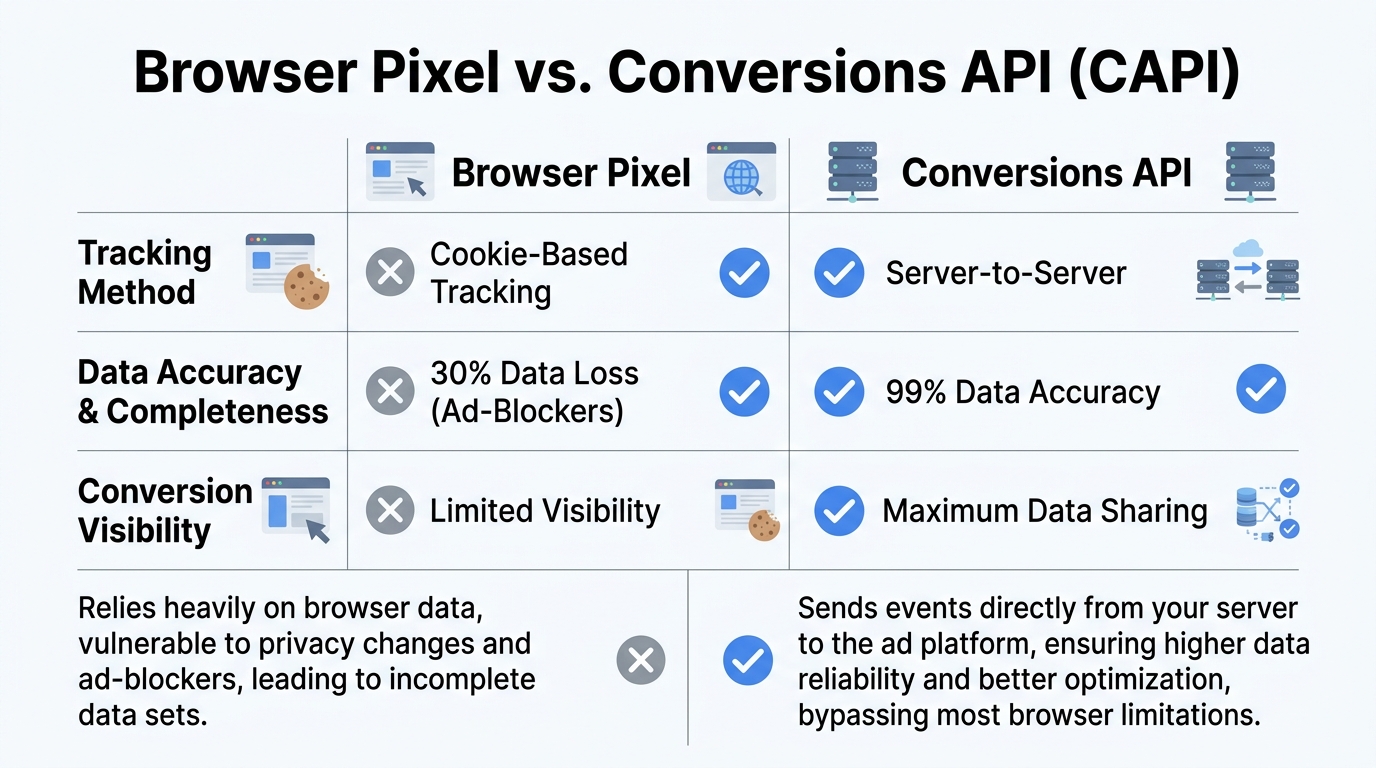
Gone are the days when a simple browser-based pixel was enough. In 2026, browser-only tracking is significantly degraded by cookie blockers and intelligent tracking prevention. To maintain a high Event Match Quality, ecommerce brands must use a hybrid approach: the Meta Pixel (browser-side) and the Conversions API (server-side). This dual-layered strategy ensures that even if a browser blocks a script, the Shopify server sends the transaction data directly to Meta's servers.
"The difference between a 2.0 and a 4.0 ROAS in 2026 often comes down to tracking accuracy, not just creative quality."
Step 1: Building the Meta Business Suite Foundation
Learn how to set up your business portfolio for Facebook and Instagram marketing.
Before touching your Shopify dashboard, you must prepare your assets within the Meta Business Suite. This serves as the organizational hub for your brand.
Creating Your Business Portfolio
Start by navigating to Meta Business Suite. If you are starting fresh, you will need to create a Business Portfolio. This is the container that holds your Facebook Page, Instagram account, and Ad Account. Use your store's official name for the portfolio to keep things organized. In 2026, Meta's interface is streamlined, but permissions are stricter; ensure your contact information is verified immediately to avoid account flags.
Establishing Your Identity Assets
- Facebook Page: Head to your personal profile, select the menu grid, and click "Page." Use your store name, relevant categories, and high-quality square profile images.
- Instagram Account: Create a dedicated Instagram for your business. Linking this early is critical for cross-platform ad delivery.
- Ad Account: Within Business Suite settings, navigate to "Ad Accounts" and create a new one. Select your correct local currency and time zone—this cannot be changed later without creating a new account.
| Asset Type | Primary Function in 2026 | Critical Action Item |
|---|---|---|
| Business Portfolio | Centralized governance | Verify business email |
| Ad Account | Financial and bidding hub | Add payment method immediately |
| Meta Pixel | Behavioral data collection | Connect to Shopify via CAPI |
Step 2: Connecting Shopify and Meta via Official App
Follow along to connect your Facebook account directly to your Shopify store interface.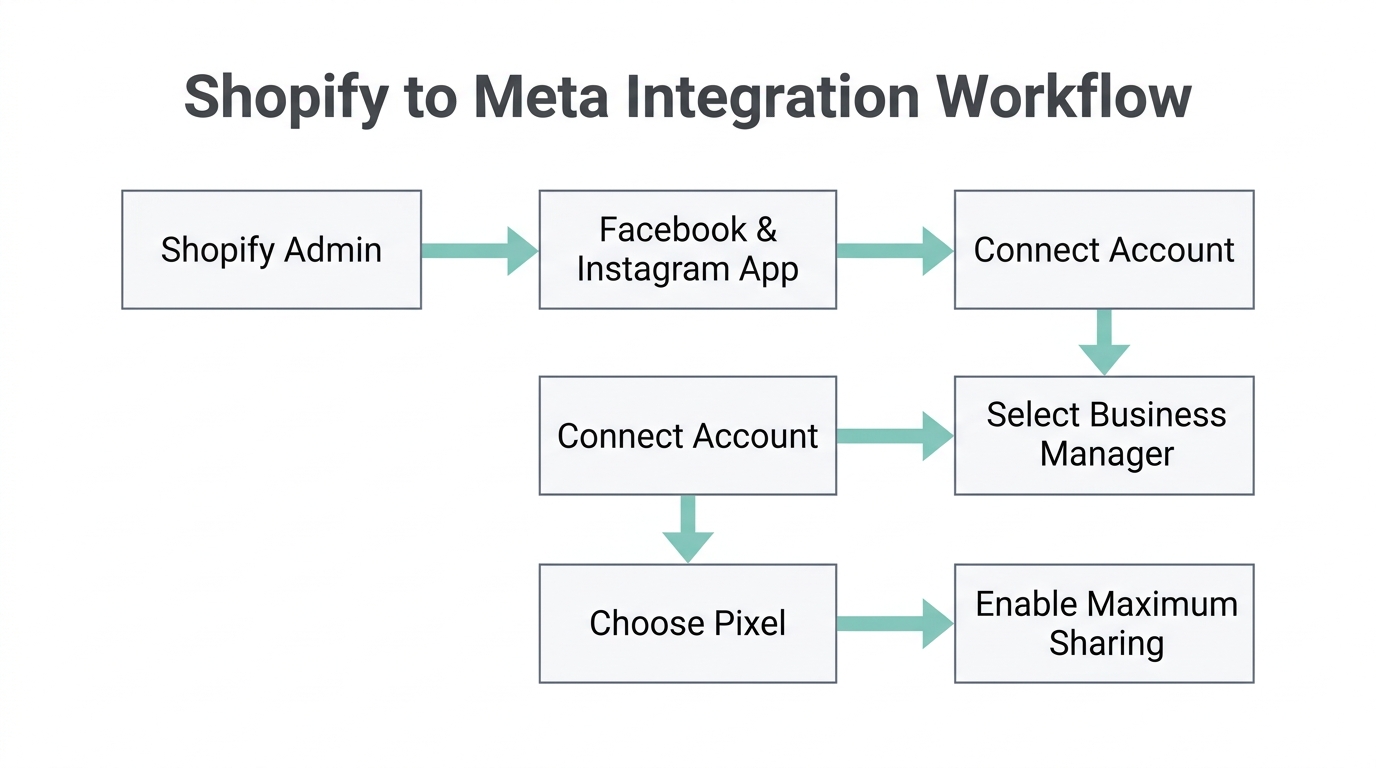
The most reliable way to implement Facebook tracking for Shopify is through the official "Facebook and Instagram" sales channel. This integration handles the complex technical handshake between the two platforms automatically.
Installation and Permissions
In your Shopify admin dashboard, go to "Sales Channels" and search for the Facebook and Instagram app. Once installed, click "Connect Account." You will be prompted to log in to your personal Meta account to authorize the connection. In 2026, ensure you select the "Shop and Ads" configuration to enable full catalog and tracking capabilities.
Step 3: Configuring 'Maximum' Data Sharing
This is the most critical step in the entire Meta Pixel Shopify tutorial 2026. During the setup process within Shopify, you will reach a section titled "Data Sharing." You will see three options: Conservative, Enhanced, and Maximum.
"Always choose 'Maximum' data sharing. It is the only setting that fully activates the Conversions API with advanced matching for your Shopify store."
The Maximum setting uses Advanced Matching, which sends hashed customer information (like email addresses and phone numbers) to Meta. This helps Meta identify users across devices even when they aren't logged in on a specific browser. This high-fidelity data is what allows ecommerce data sharing settings to fuel the machine learning algorithms that lower your CPA.
Step 4: Creating the Pixel and Navigating Events Manager
See the exact steps for setting up Conversions API through the partner integration.Once you've selected Maximum sharing, the app will ask you to connect or create a Pixel. If you don't have one, click "Create New." This Pixel acts as the heartbeat of your store, monitoring every click, view, and purchase. Stormy AI can later use this data to generate weekly performance reports, flagging underperforming SKUs or high-spend/low-ROAS campaigns before they waste your budget.
Activating the Conversions API (CAPI)
After finishing the setup in Shopify, you must finalize the Shopify Conversions API setup in the Meta Events Manager.
- Navigate to "Data Sources" in Business Suite and select your new Pixel.
- Click "Go to Events Manager."
- Select "Continue Pixel Setup" and choose "Conversions API."
- Choose Set up with partner integration and select Shopify from the list.
Step 5: Testing and Verifying Your Tracking
Watch how to send test traffic and verify your pixel is tracking correctly.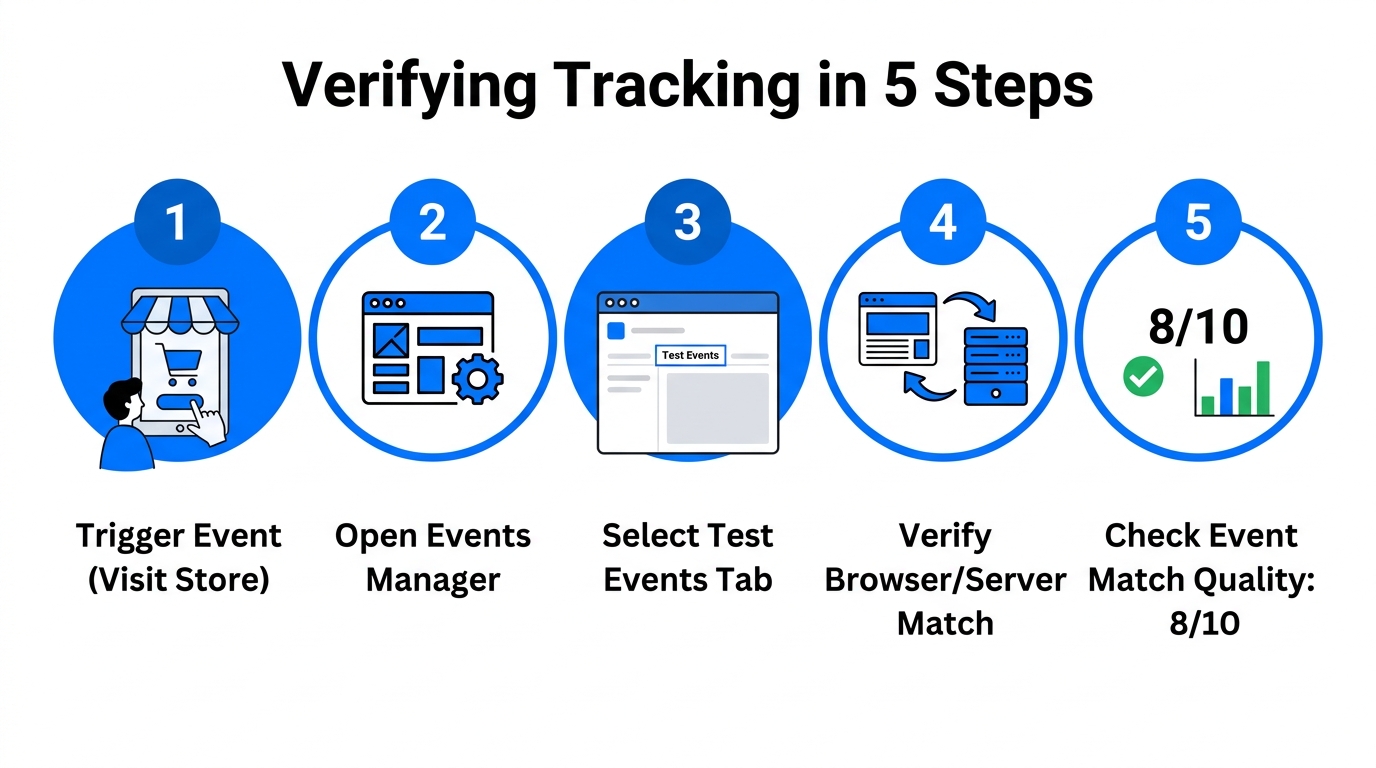
Setup is only half the battle; verification is the other half. You must ensure that the Meta Events Manager guide steps you followed are actually producing data. In 2026, the "Test Events" tool is the gold standard for this.
Using the Test Traffic Tool
Within Events Manager, go to the "Test Events" tab. Enter your store's URL and click "Open Website." Navigate your store as if you were a customer: click on a product, add it to your cart, and initiate a checkout. When you return to the Events Manager tab, you should see these events appearing in real-time. Look for the label "Browser | Server" next to each event—this indicates that both the Pixel and the CAPI are firing correctly for that action.
It is common for the Pixel to say "No activity yet" for the first 30 to 60 minutes. If it doesn't show active status after an hour, re-check your Shopify app permissions. Once active, your Stormy AI agent can begin pulling this performance data from Meta and Shopify to keep your P&L workbook updated daily.
Scaling Your Store with AI Automation
Setting up your tracking is a technical task, but running the ads is an operational one. This is where Stormy AI changes the game. While the Meta Pixel collects the data, Stormy AI acts as your AI ecommerce employee to act on it.
- Daily Audits: Stormy wakes up every morning, checks your ROAS across Meta, Google Ads, and TikTok Ads Manager, and flags any campaign where the CPA exceeds your target.
- Inventory Sync: If a specific SKU starts scaling via your Meta Ads, Stormy monitors your Shopify inventory levels and alerts you or your supplier before you hit a stockout.
- Reporting: Instead of manual spreadsheets, Stormy builds polished XLSX reports with charts and commentary, summarizing what changed week-over-week.
"The future of ecommerce isn't just having better data; it's having an AI teammate who knows how to use it while you sleep."
Final Checklist for Success
Your Meta Pixel Shopify tutorial 2026 journey concludes with a few maintenance checks. Ensure you check your Events Manager monthly to monitor Event Match Quality scores. Aim for "Great" or "Excellent" ratings, particularly for Purchase and Lead events. By combining the technical precision of the Shopify Conversions API with the autonomous operational power of Stormy AI, you are building a resilient ecommerce brand capable of scaling in any market environment.