How to Create and Authorize a Meta Ads Account for Shopify: 2026 Playbook
Master your Meta Ad Account setup for Shopify in 2026. Learn to manage payment methods, permissions, and automation with this comprehensive administrative guide.
In 2026, the barrier to entry for ecommerce isn't the product or the website; it’s the increasingly complex administrative back office. While launching a store takes minutes, properly configuring a Meta Ad Account for Shopify can take hours of navigating nested menus, authorization hurdles, and the dreaded "Ad Account Disabled" flags. To scale effectively this year, you need more than just a marketing strategy—you need a rock-solid operational foundation. This is where an AI ecommerce employee like Stormy AI becomes invaluable, acting as a teammate that monitors these assets while you focus on brand vision.
Setting up your Meta Business Suite correctly ensures that your tracking is accurate, your payments are secure, and your permissions are segmented for growth. This playbook covers the financial and administrative essentials to get your Shopify store ready for high-scale Meta advertising.
Step 1: Building Your Meta Business Portfolio
Learn how to set up or select the right Meta business portfolio for your brand.
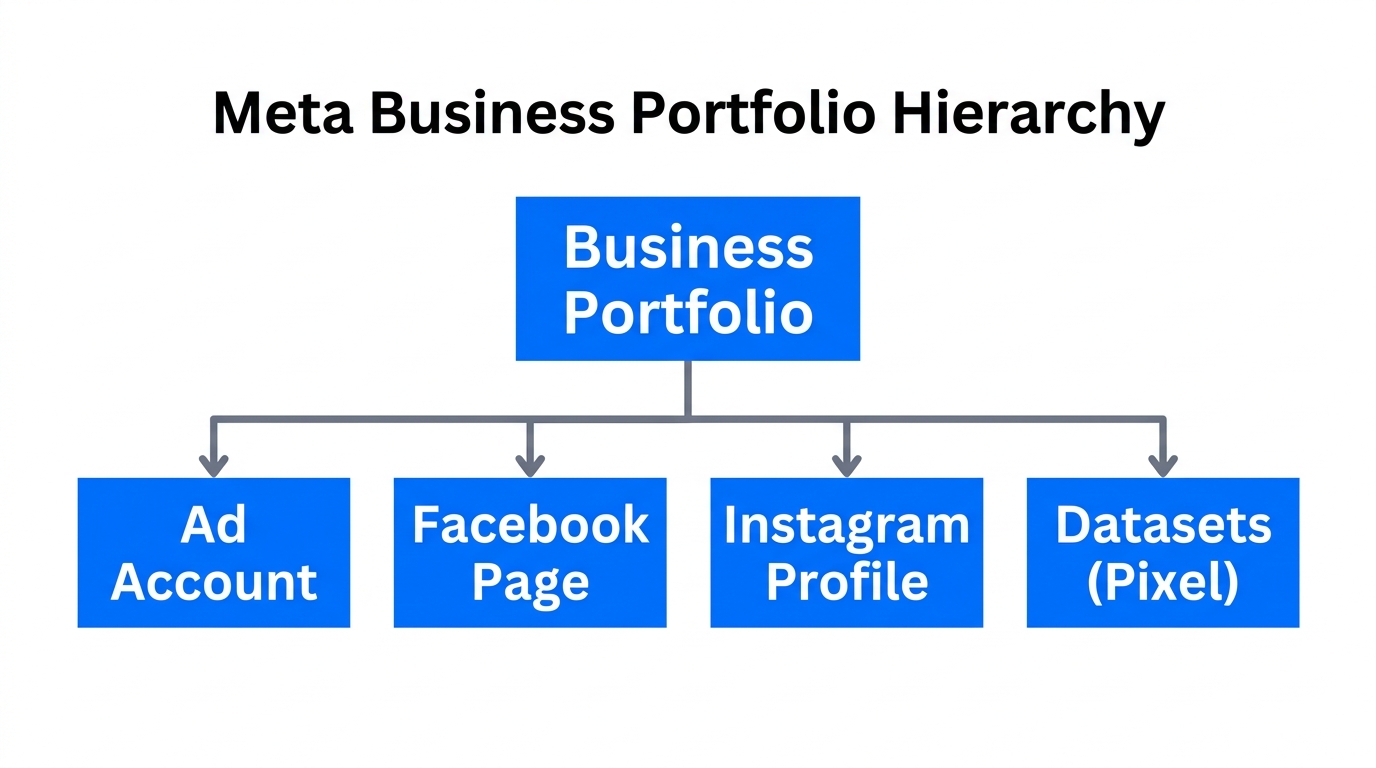
The first step in any professional setup of Facebook ads for Shopify is moving away from personal accounts. You must create a dedicated Business Portfolio (formerly known as Business Manager) to house your assets. This provides a layer of security and allows for cleaner permission management as you bring on contractors or AI agents.
Navigate to Meta for Business and log in. If you are starting fresh, you will likely see a blank slate. Click the dropdown menu and select "Create a Business Portfolio." We recommend naming the portfolio exactly as your Shopify store appears. This prevents confusion when auditing invoices or scaling into multi-brand operations. Once you enter your contact information and click "Create," you will be prompted to add pages or accounts. For now, skip these prompts to ensure you configure the core settings first.
"Your Business Portfolio is the vault. Don't just toss items in; organize it from day one so your AI tools can navigate it without friction."
Step 2: Creating and Branding Your Social Assets
Before you can spend a dollar on Meta, you need a visual presence. This involves creating a Facebook Page and a professional Instagram account that reflect your brand's identity.
- Facebook Page: Head to the grid menu on Facebook and select "Page." Name it after your store, choose your category, and fill in the bio.
- Visual Consistency: Upload a square profile picture (logo) and a rectangular cover photo (hero image). Meta’s 2026 algorithm favors accounts with complete profiles, including phone numbers, location data, and website URLs.
- WhatsApp Integration: Meta now heavily incentivizes connecting a WhatsApp Business number. If you have one, enter the number, receive the code, and confirm.
Once these are live, you must link them to your Business Portfolio. Inside the Meta Business Suite, go to "Settings," then "Pages," click "Add," and select "Add an existing Facebook page." Repeat this for your Instagram account under the "Instagram Account" tab. This centralization is what allows Stormy AI to later monitor comments and engage with customers across both platforms automatically.
Step 3: Ad Account Creation and the Payment Minefield
Ensure your Meta ad account is ready by adding payment info and account details.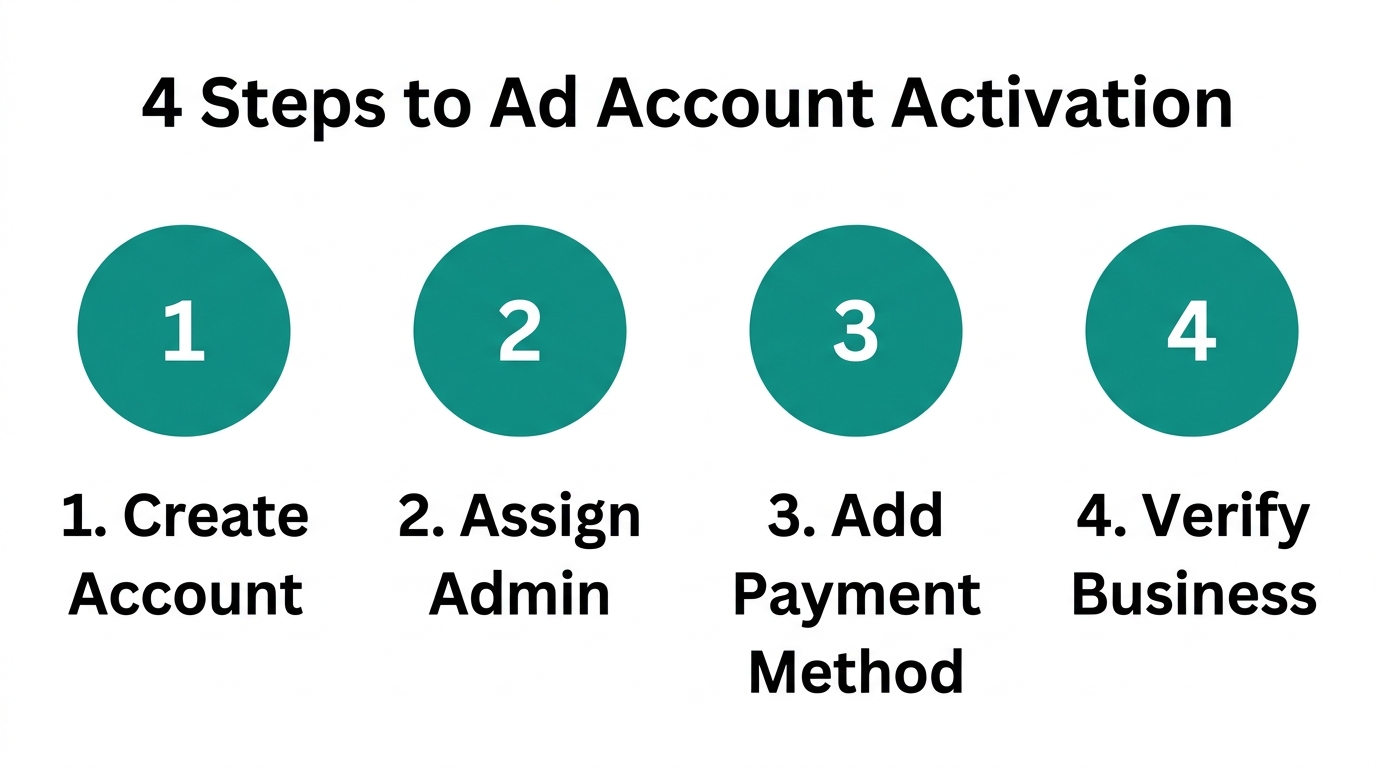
This is the stage where most founders hit a wall. Creating the Ad Account itself is simple, but authorizing Facebook ad account payment methods requires precision to avoid instant account bans.
The Setup Process
In the Business Suite settings, click "Ad Accounts," then "Add," and finally "Create new ad account." You must ensure your time zone and currency match your Shopify store’s primary settings—changing these later is a massive administrative headache. Select "My Business" for usage and click "Create."
Managing Payment Methods
Immediately after creation, click "Add Payment Info." You can use a debit or credit card, though most high-growth brands prefer a business credit card for the rewards and higher limits. In 2026, ensure the billing address on the card matches the business address provided in your Meta profile.
If you are managing multiple accounts, Stormy AI can be configured to check these statuses daily. If a payment fails or a card expires, Stormy can flag the issue in your shared spreadsheet and draft an alert for you, preventing downtime that kills your campaign momentum.
| Asset Type | Primary Purpose | Managed By |
|---|---|---|
| Business Portfolio | The master container for all assets | Founder / Admin |
| Ad Account | Where campaigns and payments live | Stormy AI / Media Buyer |
| Meta Pixel | The data bridge to Shopify | Shopify Integration |
| FB/IG Pages | The public face of the brand | Content Team |
Step 4: Meta Business Suite Permissions and Connected Assets
See how to link your Instagram account and other assets to your business portfolio.An ad account is useless if it doesn't have permission to use your Page and Instagram account. This is the step most people miss during a Meta Ad Account setup for Shopify.
Go to your "Pages" tab in settings and click "Connect Assets." Choose your Instagram account and log in to authorize the link. Then, go to the "Instagram Accounts" tab, click "Connect Assets," and select your new Ad Account. This creates the three-way link required to run ads from your Instagram handle through your ads manager.
For Shopify marketing automation 2026, ensure you have assigned "Full Control" permissions to yourself and any necessary partners. If you are using an AI agent like Stormy AI to pull performance reports, you will add it as a user with view-only or manager access to these assets. This allows Stormy to jump into your Meta Ads Manager, pull your CPA and ROAS data, and summarize it for your weekly P&L.
"Permissions aren't just about security; they're about accessibility. If your AI teammate can't see the data, it can't save your business."
Step 5: The Shopify Integration and Conversions API
Link your Shopify store to Meta and set up the Conversions API for data.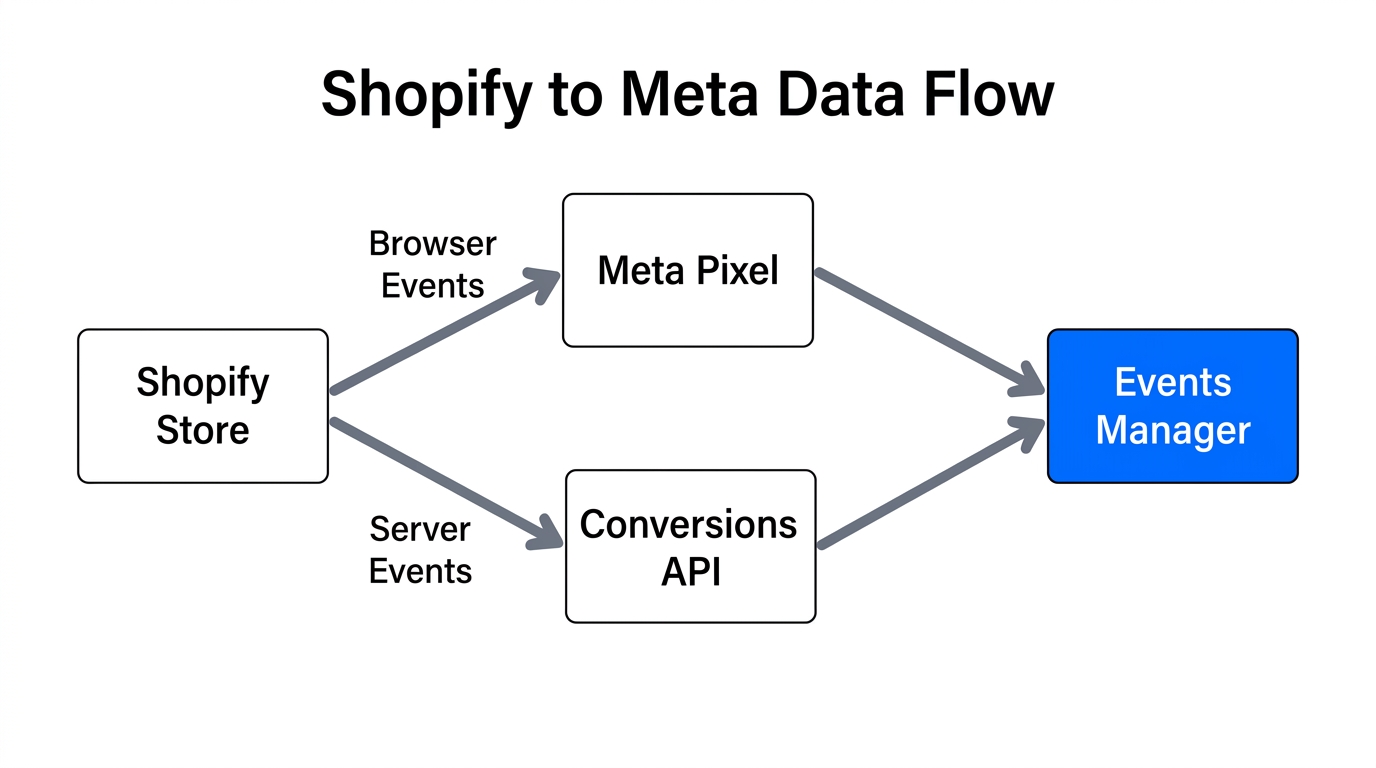
Now that the Meta side is ready, you must build the bridge to your store. In your Shopify dashboard, navigate to "Sales Channels" and install the Facebook and Instagram app.
The Connection Playbook
- Click "Connect Account" and log into your personal Facebook account that manages the Business Portfolio.
- Choose "Shop and Ads" to ensure you get the full suite of features.
- Select your Business Portfolio, Page, and Ad Account from the dropdowns.
- Data Sharing: Select "Maximum." This enables the Conversions API (CAPI), which is essential in 2026 for bypassing browser tracking limitations.
Shopify will prompt you to "Create Meta Pixel." Even if you have an old one, creating a fresh pixel via the Shopify app ensures the integration is clean. Once created, click "Confirm" and "Submit for Review."
Verifying the Pixel
Return to the Meta Business Suite under "Data Sources" > "Data Sets." Click "Go to Events Manager" and select "Continue Pixel Setup." Choose the "Conversions API" and use the "Partner Integration" with Shopify. Enter your URL and send test traffic. Do not worry if it says "No activity yet." It can take up to two hours for the handshake between Shopify and Meta to finalize.
Scaling Operations: Why AI Management is the New Standard
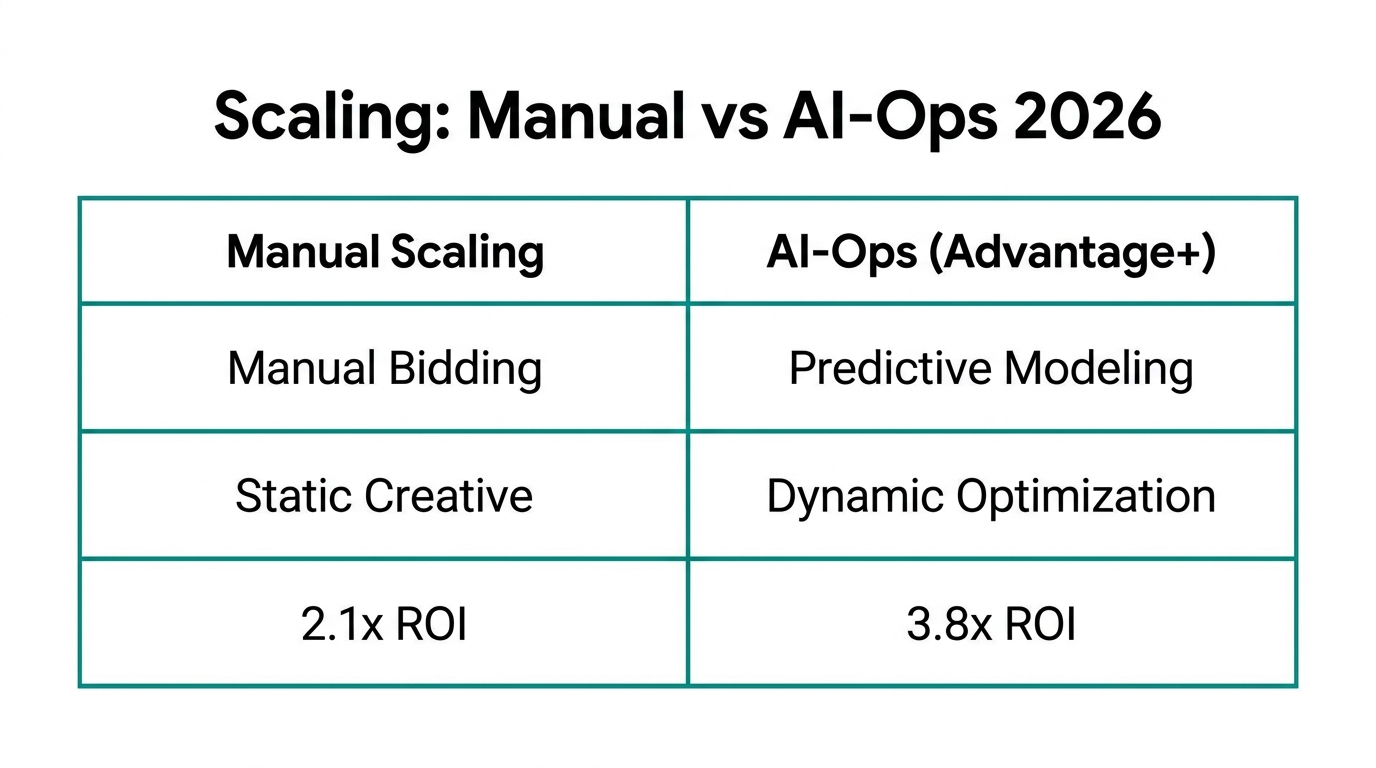
Setting up your account is just the beginning. The real challenge is the daily maintenance of these assets. In 2026, the complexity of Meta Business Suite permissions and API stability means things break frequently. A disconnected Pixel or a suppressed listing can cost thousands in missed revenue before you even notice.
This is where Stormy AI changes the game. As an AI ecommerce employee, Stormy doesn't just look at a dashboard; it operates the tools. It can:
- Monitor Ad Health: Automatically check if your Ad Account is active and flag any payment failures immediately.
- Audit Data Accuracy: Compare the revenue reported in Shopify vs. Meta Ads and alert you to tracking discrepancies.
- Manage Creative Assets: Keep track of which ad creatives are performing best and drop a weekly performance report into your Slack or email.
- Automate Follow-ups: If you are working with creators for your ads, Stormy can handle the outreach and tracking of content posts directly within its internal CRM.
Final Checklist for Meta Success
Before you turn on your first campaign, run through this final administrative check:
- Is the Ad Account currency correct?
- Are the FB Page and IG Account both "Connected Assets" in the Ad Account settings?
- Is the Shopify Data Sharing set to "Maximum"?
- Has the test traffic been verified in the Events Manager?
- Is your AI agent, like Stormy AI, connected to monitor for downtime?
By following this 2026 playbook, you aren't just setting up an account; you're building a scalable marketing machine. The administrative side of ecommerce may be messy, but with the right structure and an AI teammate, it’s a hurdle you only have to clear once. Ready to automate your ecommerce back office? Let Stormy AI take the wheel while you scale your brand.