How to Connect Facebook and Instagram to Shopify for Meta Ads in 2026
Learn how to connect Facebook to Shopify 2026 with our complete guide. Master Instagram shopping Shopify setup and Meta Ads for Shopify guide to scale your store.
In 2026, the landscape of social commerce has shifted from a secondary revenue stream to the primary driver of ecommerce growth. With over 80% of consumer purchase journeys beginning on social feeds, having a seamless bridge between your store and your social profiles isn't just an advantage—it is a baseline requirement. For founders looking to scale, the Meta Ads for Shopify guide provides the foundational infrastructure needed to leverage advanced machine learning and high-intent audience targeting. Setting this up correctly today ensures your pixel data remains clean and your attribution stays accurate as you scale.
While the technical steps might seem daunting, running a modern brand is no longer a solo manual effort. An AI ecommerce employee like Stormy AI can monitor your inventory levels across platforms, draft restock POs to suppliers, and flag stockout risks before a high-performing Meta campaign wastes your budget on out-of-stock items. In this tutorial, we will walk through the exact steps to build your Meta Business infrastructure from scratch and link it directly to your Shopify dashboard.
Phase 1: Creating Your Meta Business Portfolio
Learn how to set up and manage your Meta Business portfolio effectively for ads.
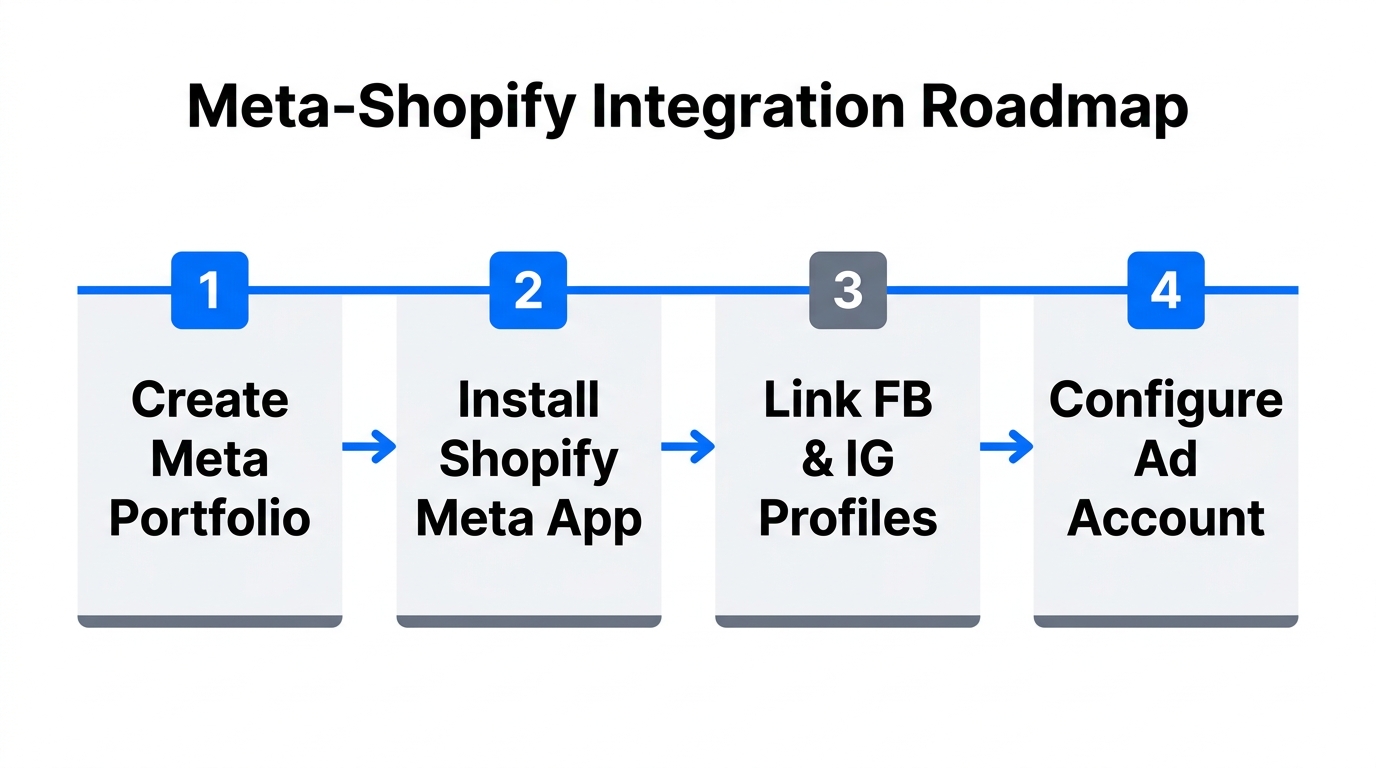
The first step in any Meta Business Suite Shopify integration is creating a centralized hub for your assets. In 2026, Meta uses the term "Business Portfolio" (formerly Business Manager) to house your pages, accounts, and pixels. To start, navigate to Meta for Business and log in with your personal Facebook credentials. Even if you plan to keep your personal and professional lives separate, Meta requires a personal anchor account to verify your identity.
"Your Meta Business Portfolio is the digital vault for your brand's assets; keeping it organized from day one is the difference between a scalable brand and a messy back office."
Once logged in, click the dropdown menu and select 'Create a Business Portfolio'. We recommend naming this portfolio exactly the same as your Shopify store to avoid confusion as you grow. Enter your professional contact information and click 'Create'. You may be prompted to connect an Instagram or Facebook page immediately, but for the sake of a clean setup, we suggest skipping those initial prompts to configure them manually in the next steps.
Phase 2: Creating Facebook and Instagram Assets
Before you can connect Facebook to Shopify 2026, you need the actual surfaces where your ads will live. Even in an era of TikTok dominance, the Facebook News Feed and Instagram Reels remain the highest-converting placements for Shopify stores. To create your page, go to your personal Facebook account, click the grid menu, and select 'Page'.
The Professional Page Checklist
- Page Name: Matches your Shopify store exactly.
- Category: Accurate to your niche (e.g., Clothing Brand, Health/Beauty).
- Profile Picture: A high-resolution square logo.
- Cover Photo: A rectangular hero image, ideally the same one used on your Shopify homepage for brand consistency.
- Bio/Description: A punchy 160-character summary with a clear value proposition.
After your Facebook Page is live, repeat the process on Instagram. In 2026, ensure your Instagram account is set to a Professional/Business Account type. This is a non-negotiable step for Instagram shopping Shopify setup; personal or creator accounts often face limitations when trying to sync product catalogs directly from Shopify.
Phase 3: Building Your Ad Account and Payment Infrastructure
Add payment methods to your ad account to ensure your campaigns run smoothly.An ad account is the engine that spends your budget to find customers. Inside the Meta Business Suite settings, navigate to 'Ad Accounts' and click 'Add' then 'Create new ad account'. Give the account a name, and double-check your time zone and currency. Warning: You cannot change the currency once the account is created, so ensure it matches your Shopify store's primary currency to avoid messy exchange rate reporting.
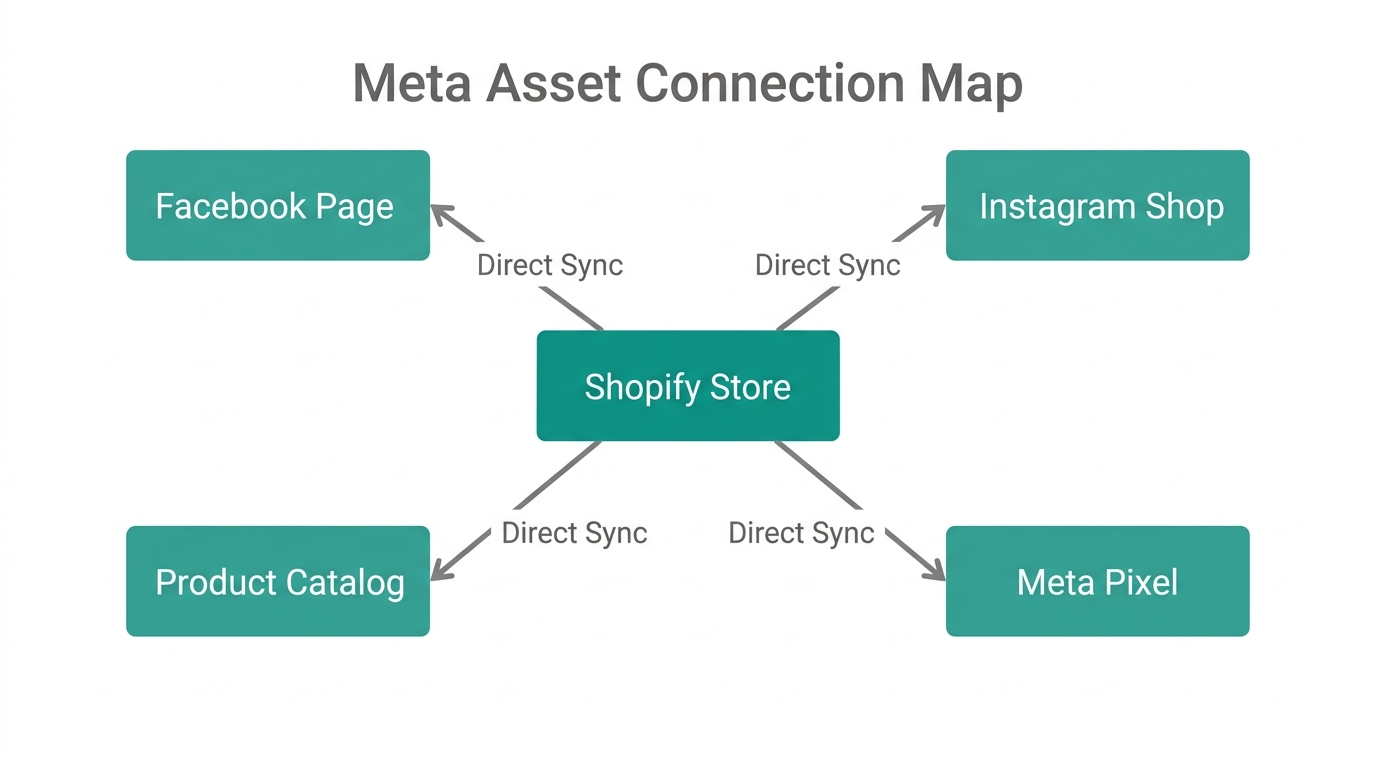
| Asset Type | Primary Function | Why It Matters for Shopify |
|---|---|---|
| Business Portfolio | Ownership & Permissions | Protects your assets and manages team access. |
| Ad Account | Spending & Campaign Management | Where you build and track your paid traffic. |
| Meta Pixel | Data Tracking | Tells Meta who bought what and for how much. |
| Product Catalog | Inventory Sync | Automatically updates product images/prices in ads. |
Immediately after creation, add your payment method. Meta is notoriously strict about payment failures in 2026; a single declined transaction can lead to a disabled ad account. We recommend using a dedicated business credit card or a digital wallet like Stripe or PayPal. Once your payment info is saved, refresh the page to ensure the account status shows as 'Active'.
Phase 4: Linking Assets for Cross-Platform Success
To ensure your ads run seamlessly on both Facebook and Instagram feeds, your assets must be "shaking hands" within the Meta ecosystem before you involve Shopify. This is a common point of failure for many Shopify sales channel setup attempts.
- Go to the 'Pages' tab in Meta Business Suite and add your existing Facebook Page.
- Go to the 'Instagram Accounts' tab and click 'Claim Instagram Account'. You will be prompted to log in to verify ownership.
- Select your Instagram account, click 'Connect Assets', and choose your Ad Account. This allows the Ad Account to "speak" through your Instagram profile.
- Repeat this for the Facebook Page under the 'Connected Assets' sub-menu.
Once this web of connections is finished, an AI ecommerce employee like Stormy AI can step in. Stormy can pull campaign performance from Meta on a schedule, compare your daily spend against real-time revenue in Shopify, and flag underperforming campaigns in a shared workbook so you don't overspend on ads that aren't converting.
"Attribution is the holy grail of 2026 ecommerce. If your assets aren't linked correctly, Meta's AI can't learn, and your ROAS will suffer."
Phase 5: Installing the Shopify Sales Channel
Connect your Shopify store to Meta by logging into your Facebook account directly.With the Meta-side infrastructure ready, it's time to head to your Shopify dashboard. Click on 'Sales Channels' in the left-hand sidebar, then search for the official 'Facebook and Instagram' app in the Shopify App Store. This app is the official conduit for your product catalog and data sharing.
Click 'Install' and 'Connect Account'. Shopify will prompt you to log into your personal Facebook account again to verify your permissions. Once connected, choose the 'Shop and Ads' configuration. This is superior to the 'Ads Only' option because it enables Instagram Shopping features, allowing customers to browse your products without leaving the social app.
Phase 6: Data Sharing and the Meta Pixel Setup
Configure the Conversions API and Meta Pixel to track data and store performance.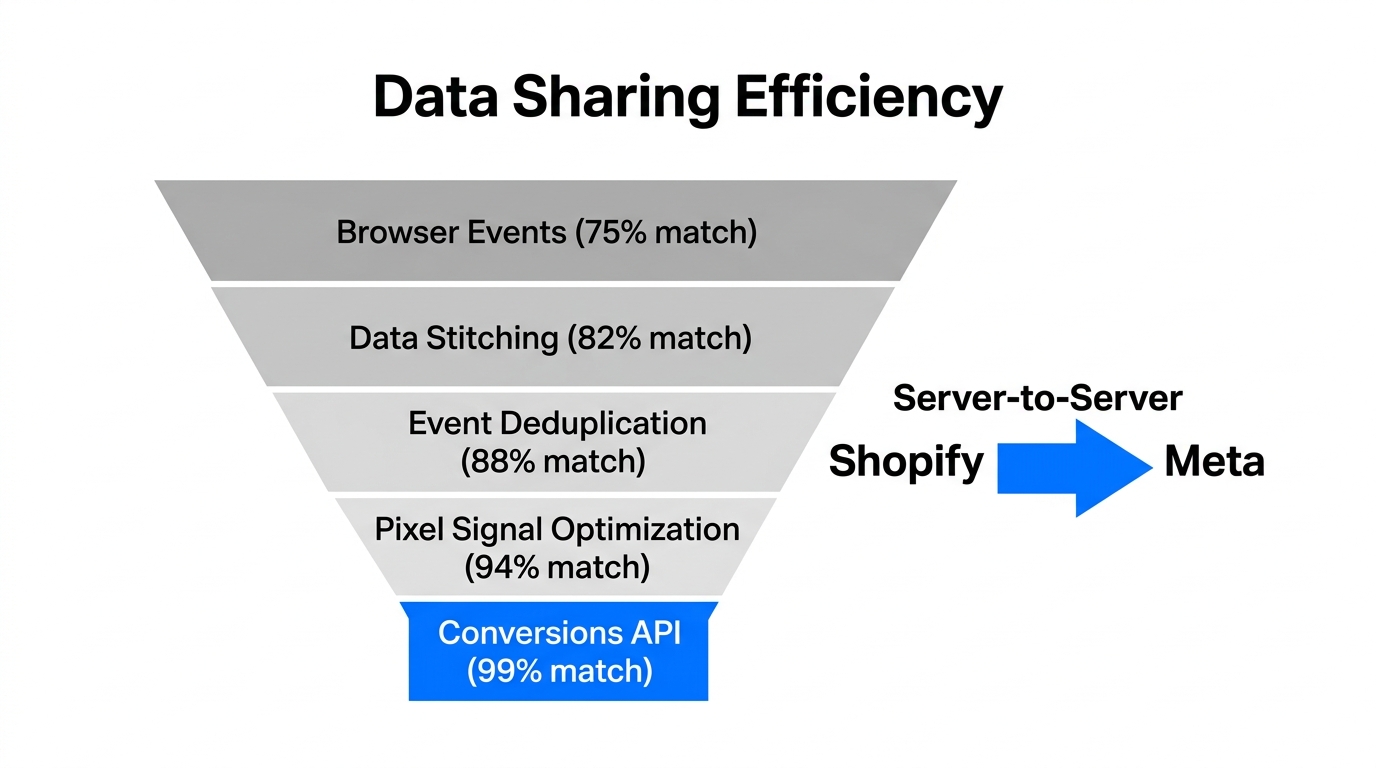
The Meta Pixel (and the Conversions API) is what allows you to track actions like 'Add to Cart' and 'Purchase'. In the Shopify setup wizard, you will reach a section for Data Sharing. In 2026, privacy regulations are stricter than ever, but Meta's server-side tracking has evolved to compensate. Choose the 'Maximum' level of data sharing.
This level uses the Conversions API to send data directly from Shopify's servers to Meta, bypassing browser-based ad blockers. Click 'Create New Pixel', name it, and confirm. This pixel will now be automatically injected into every page of your Shopify store. You no longer need to manually paste code into your theme files—the app handles everything in the background.
After your pixel is created, Stormy AI can monitor the health of these events. If the pixel stops firing or 'Purchase' events drop to zero, Stormy can alert you via Slack or email immediately, preventing you from flying blind on your ad spend.
Phase 7: Verifying the Connection and Events Manager
The final step in our Meta Ads for Shopify guide is verification. Head back to the Meta Business Suite and navigate to 'Events Manager'. You should see your newly created pixel listed under 'Data Sets'.
The Testing Playbook
- Click on 'Continue Pixel Setup' and select 'Conversions API'.
- Choose 'Set up with partner integration' and select Shopify.
- Enter your store URL and click 'Send Test Traffic'.
- Your store will open in a new tab. Browse a few products, add one to the cart, and then head back to Meta Business Suite.
It can take anywhere from 20 minutes to a few hours for the 'Active' status to appear. Once you see the green light and a 'Page View' event registered in the activity log, your Instagram shopping Shopify setup is complete. Your product catalog will now begin syncing, which can take up to 24 hours for Meta to review and approve.
"Don't panic if the pixel says 'No activity yet' for the first hour. Meta's verification servers in 2026 are robust but take time to index new store URLs."
Next Steps: Scaling with an AI Ecommerce Employee
Now that your connect Facebook to Shopify 2026 project is finished, the real work begins: running campaigns and managing the resulting growth. As your Meta Ads start driving traffic, your back-office workload will increase exponentially. This is where Stormy AI becomes your most valuable teammate.
While you focus on creative strategy, Stormy AI handles the messy logistics:
- Automated Audits: Stormy pulls your spend from Meta Ads Manager and revenue from Shopify to build daily ROAS reports.
- Creator Operations: Use Stormy to discover and outreach to creators on Instagram who can produce UGC for your ads.
- Customer Support: As ad comments and DMs roll in, Stormy can help organize and draft replies to frequently asked questions.
- Supplier Follow-ups: If a campaign goes viral, Stormy tracks your lead times and reminds your suppliers about pending shipments to prevent stockouts.
Building a brand in 2026 requires a tech-first mindset. By integrating your Meta and Shopify ecosystems correctly and leveraging AI for the operational heavy lifting, you're not just building a store—you're building an autonomous commerce engine. Ready to let an AI agent handle the back office? Hire Stormy AI today and start scaling your Meta Ads with confidence.