2026 Guide: How to Display Real-Time Shopify Inventory on Any External Website
Learn how to use the Shopify Storefront API to sync real-time inventory to Webflow or Framer. Boost conversion with scarcity and automate ops with Stormy AI.
In the high-velocity ecommerce landscape of 2026, the traditional boundaries of your online store have dissolved. Success no longer depends solely on your Shopify theme; it depends on your ability to sell anywhere—on custom landing pages, mobile apps, or headless platforms like Webflow and Framer. However, the biggest challenge for omnichannel merchants remains synchronization. There is nothing that kills brand trust faster than a customer clicking "Buy Now" on a Webflow page only to find the item is out of stock at checkout.
Displaying real-time ecommerce inventory display metrics on external sites is no longer a luxury; it is a conversion necessity. By pulling live data directly from your backend, you can leverage the psychological power of scarcity. In this guide, we will walk through the advanced implementation of the Shopify Storefront API access token system to pull protected data fields like totalInventory and display them on any third-party site. We will also look at how an AI ecommerce employee like Stormy AI can sit in the background, monitoring these levels and handling the manual follow-ups with suppliers when your live stock counts dip too low.
The Power of Real-Time Scarcity in 2026
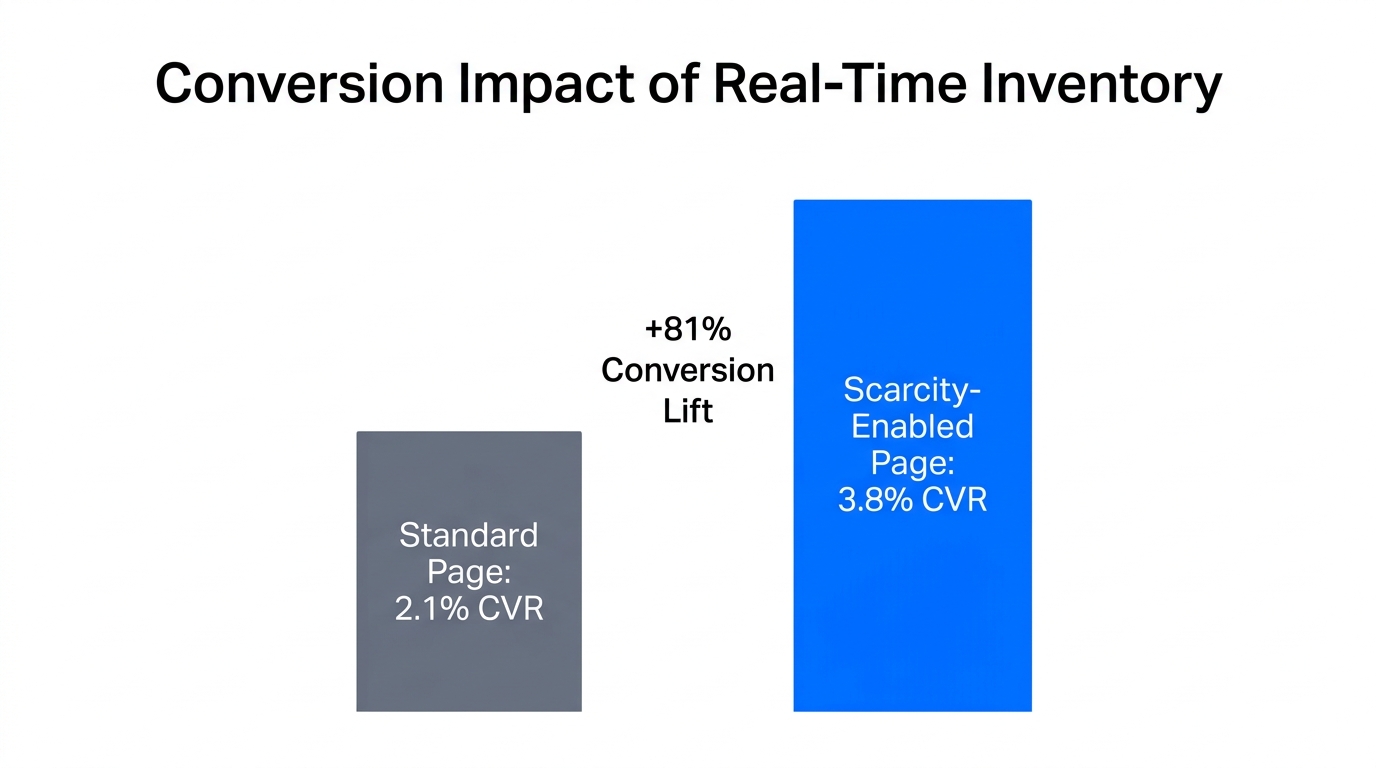
As consumer attention spans continue to shrink this year, transparency is the ultimate differentiator. In 2026, the "only 3 left in stock" badge is not just a marketing gimmick; it is a critical data point that helps shoppers make informed decisions. According to research from Coding with Jan, merchants using real-time stock counts on landing pages see a significant lift in checkout completion rates compared to static pages.
"The key to conversion in 2026 isn't just a pretty site; it's trust through transparency. Real-time inventory isn't just data—it's a psychological trigger that turns browsers into buyers."
Choosing the Right Method: Buy Button vs. Storefront API
Jan explores two primary methods for integrating Shopify products into your external website.
Before we dive into the code, you must decide which level of customization your brand requires. For simple implementations, Shopify provides a legacy solution, but for those seeking deep integration with custom CSS and protected data, the Storefront API is the only path forward. While you manage the front-end display, Stormy AI handles the back-office inventory monitoring, ensuring that once that inventory count hits zero, your supplier is already notified of a reorder.
| Feature | Shopify Buy Button | Storefront Web Components |
|---|---|---|
| Setup Time | 2-5 Minutes | 15-30 Minutes |
| Customization | Limited (Iframe) | Full HTML/CSS Control |
| Real-Time Stock Counts | No (Native) | Yes (Protected Data) |
| Platform Compatibility | Any site with HTML | Any site with JS Support |
| Effort to Sync | Automatic | Requires API Key |
If you choose the Buy Button, you can simply install the Buy Button channel and generate a snippet. However, for a real-time ecommerce inventory display, we must go deeper into the Shopify Headless API permissions.
Step 1: Generating a Public Access Token via the Headless App
Step-by-step instructions on securing the necessary public access tokens for your API integration.The totalInventory field is a protected data point. Shopify does not expose this by default to prevent competitors from scraping your stock levels. To display it, you need a Shopify Storefront API access token with specific permissions. This is where most developers get stuck, but the process is straightforward if you use the right tools.
- Navigate to your Shopify admin and install the free Headless app.
- Create a new "Storefront" inside the app. This represents your external website (e.g., your Framer or Webflow site).
- Under "Manage API Access," locate the Storefront API section.
- Copy the Public Access Token. Note: Never use your Admin API secret key on the frontend; only use the public token.
While you are setting up your API access, Stormy AI can be configured to monitor the very same data. While your website shows the inventory, Stormy acts on it—tracking SKUs and lead times in a living spreadsheet and alerting you when a shipment is late.
Step 2: Configuring API Permissions
To show Shopify stock on Webflow, you must specifically allow the API to read inventory levels. Within the Headless app settings:
- Click on "Edit" in the API Permissions section.
- Scroll down to the "Inventory" section.
- Enable
unauthenticated_read_product_inventory. - Save your changes.
Step 3: Implementation Walkthrough (The Code)
A detailed walkthrough of adding custom data attributes and previewing the final product live.
Shopify now provides pre-built web components that make using the Storefront API much simpler than writing raw GraphQL queries. This allows you to use Shopify inventory sync 2026 standards without being a full-stack engineer. As highlighted by Coding with Jan, these components act like a templating language on top of the API.
First, wrap your product display in the shopify-store component. This is the container that establishes the connection to your backend.
<shopify-store
  store-domain="your-store.myshopify.com"
  public-access-token="YOUR_COPIED_TOKEN_HERE">

  <shopify-context type="product" handle="your-product-handle">
    <h1><shopify-data query="product.title"></shopify-data></h1>
    <p>Stock remaining: <shopify-data query="product.totalInventory"></shopify-data></p>
  </shopify-context>
</shopify-store>
In this snippet, the shopify-data tag with the query product.totalInventory is the magic piece. Because you provided the public-access-token at the top level, the component can reach into the protected fields and pull the live number. If you fail to provide the token or miss the Shopify Headless API permissions, you will see an "Access Denied" error in your console.
"2026 is the year of the 'Intelligent Storefront.' Your code should not just display data; it should drive the entire supply chain workflow."
Step 4: Integrating with Webflow and Framer
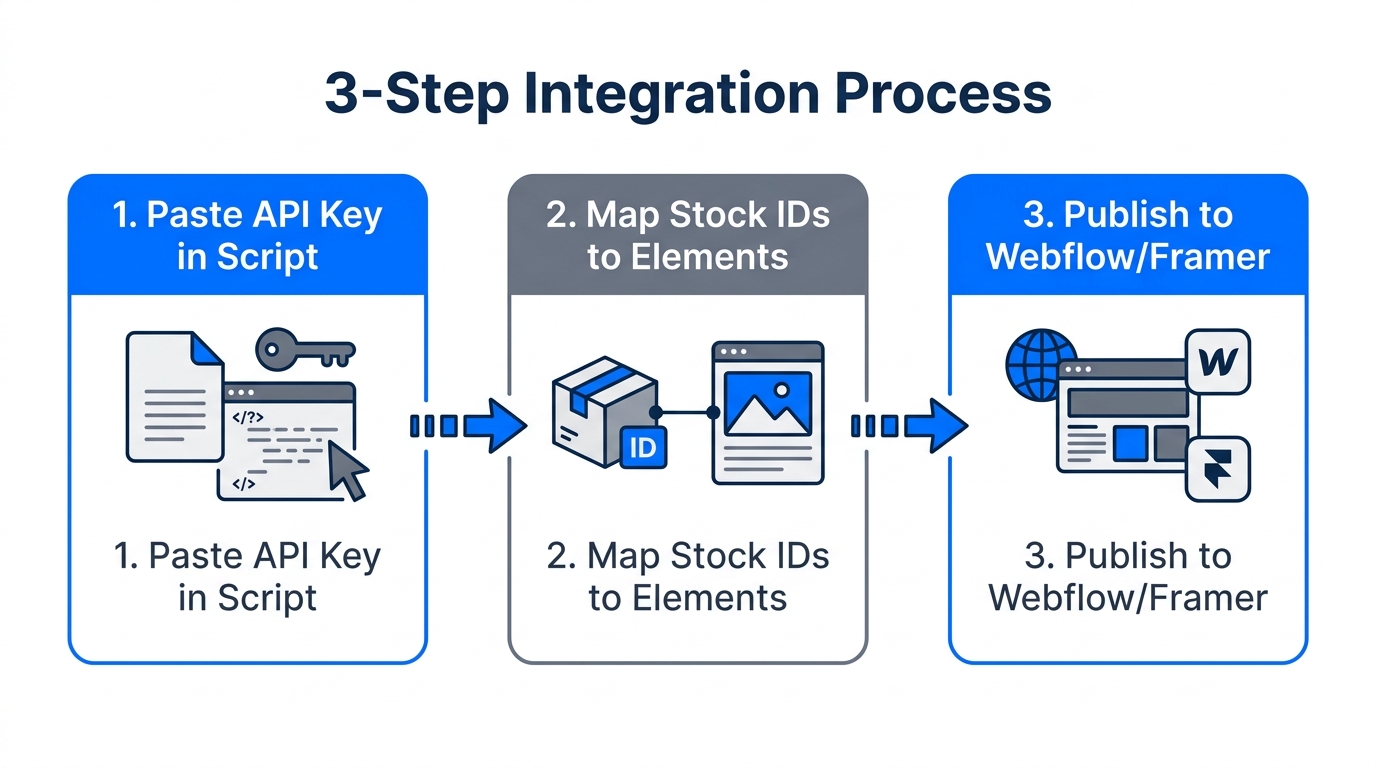
To show Shopify stock on Webflow, you don't need a complex plugin. You simply need a "Code Embed" element. Most modern site builders like Framer or Webflow allow you to paste custom HTML and Javascript directly into a section.
How to Embed on Webflow:
- Open the Webflow Designer and go to the page where you want the product to appear.
- Add a Code Embed element from the Add panel.
- Paste your
shopify-storecode block into the editor. - Include the Shopify Storefront Web Component script in your site-wide header or footer settings (usually found in the Shopify Developer Documentation).
- Publish your site to see the real-time ecommerce inventory display live.
If you are managing dozens of products across multiple landing pages, manually checking if these embeds are still working is a nightmare. This is where Stormy AI steps in. You can ask Stormy to perform a weekly audit of your external landing pages to ensure the inventory counts are loading correctly and that no listing issues (like missing images or broken variants) are costing you revenue.
Step 5: Automating the Back Office with Stormy AI
Once your real-time inventory is live on your external sites, your job isn't finished—it’s just automated. The bottleneck shifts from data display to supply chain management. If your Webflow page does its job and drives a surge of sales, you need to ensure you don't actually run out of stock.
Stormy AI acts as your autonomous ecommerce teammate. While the Storefront API talks to your customers, Stormy talks to your business. Here is how Stormy handles the inventory lifecycle in the background:
- Inventory Monitoring: Stormy connects to your Shopify and Amazon Seller Central to monitor stock levels across all channels.
- Supplier Follow-up: If a specific SKU drops below a threshold (say, 50 units), Stormy can automatically draft and send a reorder email to your supplier via Gmail.
- Tracking Deadlines: Stormy keeps a living spreadsheet of lead times and shipment deadlines. If a supplier hasn't replied to a PO, Stormy wakes up and sends a polite follow-up until the stock is confirmed.
- Performance Reporting: Every Monday, Stormy can pull your campaign performance from Meta Ads and Google Ads, comparing your spend against the inventory you have left, ensuring you aren't wasting ad spend on low-stock items.
Conclusion: Building a Resilient Storefront
Summarizing the benefits of using modern web components for your Shopify storefront integration.Displaying live inventory on an external website is a powerful way to bridge the gap between custom marketing pages and your actual ecommerce operations. By leveraging the Shopify Storefront API access token and the Headless app, you can create a seamless, high-trust experience for your customers in 2026.
However, displaying the data is only half the battle. To scale a brand without burnout, you need an operations layer that acts on that data. By pairing the technical flexibility of the Storefront API with an AI ecommerce employee like Stormy AI, you can ensure that your front-end promises are always backed up by a robust, automated back-office. Whether it's monitoring for stockouts, following up with suppliers, or tracking creator affiliates on TikTok Ads, Stormy keeps the wheels turning while you focus on growth.
Ready to automate the messy back office of your store? Hire Stormy AI today and stop manually updating spreadsheets and following up with suppliers.