How to Automate a Free Welcome Gift with Shopify Flow and GraphQL Admin API in 2026
Learn how to automate free welcome gifts using Shopify Flow and GraphQL Admin API. Boost conversions in 2026 without expensive third-party apps with this playbook.
In 2026, ecommerce success is no longer about which store has the most expensive app stack; it is about who has the most efficient, integrated operations. Many merchants still pay hundreds of dollars monthly for "gift-with-purchase" apps that essentially perform a single task. But why add more tech debt when you can build a more robust, custom solution using Shopify native automation tools? By leveraging Shopify Flow and the GraphQL Admin API, you can create a seamless welcome gift experience that triggers the moment a first-time customer completes their checkout.
This playbook will guide you through the technical steps of staging order edits, applying programmatic discounts, and committing changes—ensuring your customers feel valued from their very first interaction. While you focus on the strategy, an AI ecommerce employee like Stormy AI can handle the inventory monitoring in the background, making sure your free gifts never hit a stockout that leads to customer disappointment.
The Logic Behind Native Gift Automation
Automating a welcome gift is a classic conversion strategy. However, doing it after the order is created—using Shopify Flow—allows you to apply complex logic that front-end scripts often struggle with. You can verify if it is truly the customer's first order, check their lifetime value, or even cross-reference their acquisition channel via Google Ads or Meta Ads data.
To pull this off, we use the GraphQL Admin API within a Flow action. This allows us to perform an "Order Edit," which is the official Shopify way to add items to an existing order. Unlike older methods, this process keeps your inventory counts accurate and your financial reporting clean. You can learn more about these advanced developer techniques at codingwithyann.com.
"In 2026, the most successful brands aren't the ones with the most apps; they're the ones with the most efficient, automated workflows."
Finding Your Product Variant ID
Learn why you need the specific variant ID to add items to orders.
Before jumping into Flow, you need the specific identifier for the gift you are giving away. Shopify stores products as Products, but the actual thing a customer buys is a Variant. Even if your gift (like a coffee scoop or a branded sticker) only has one option, it still has a unique Variant ID.
- Navigate to the product page in your Shopify Admin.
- In the browser address bar, simply add
.jsto the end of the URL (e.g.,your-store.com/products/coffee-scoop.js). - Look for the first
"id":field inside the JSON data. That is your Variant ID.
Copy this number and save it. You will need it to tell the API exactly which item to add to the customer's cart. If you have hundreds of SKUs, ask Stormy AI to organize your gift inventory in a spreadsheet so you always have these IDs ready for your next campaign.
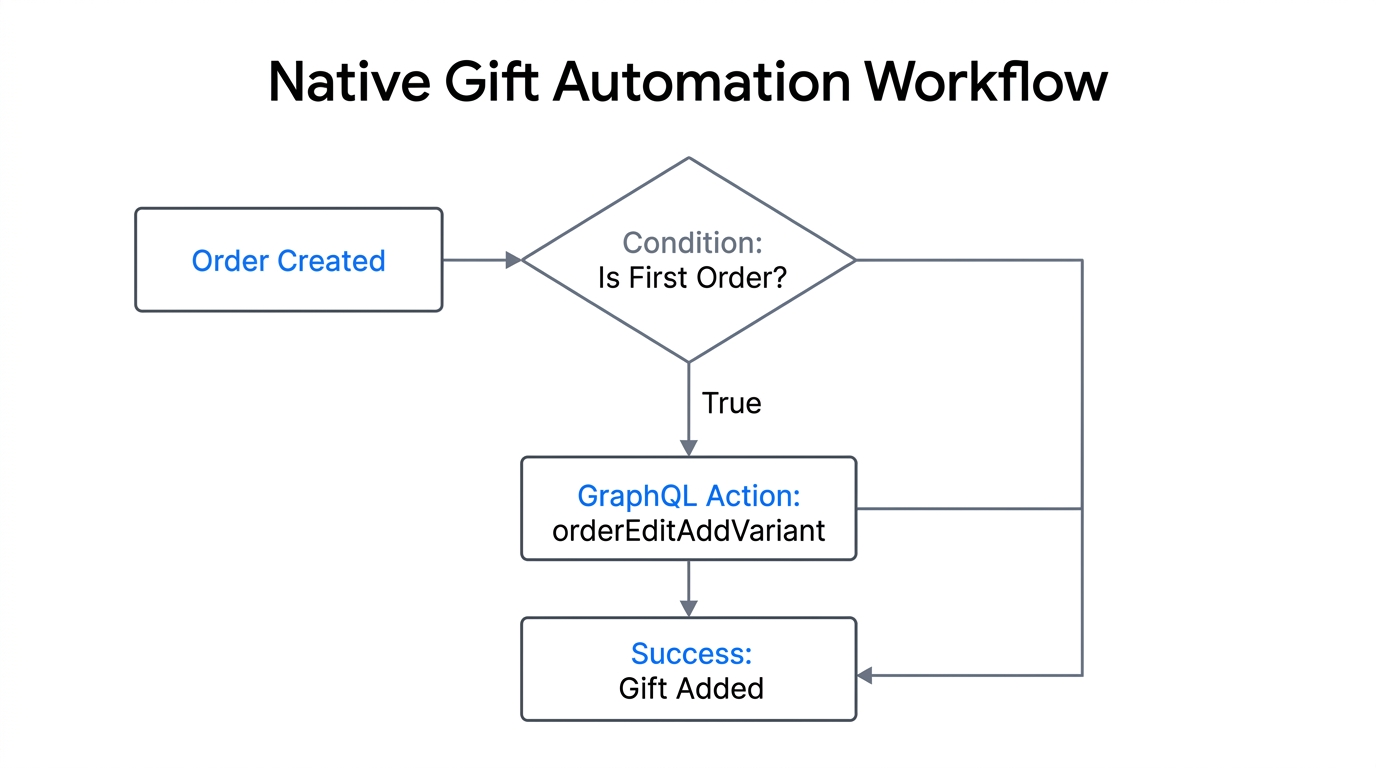
Step 1: Setting up the Shopify Flow Trigger
Start building your automation by selecting the order created trigger in Shopify Flow.First, ensure you have the Shopify Flow app installed. It is free for almost all Shopify plans in 2026. Create a new workflow and start from scratch.
The Trigger
Search for the Order created trigger. This event fires every time a customer completes a checkout. This is the moment your AI ecommerce employee "wakes up" to check if the new order qualifies for a bonus.
The Condition
We don't want to give a gift to everyone—only first-time buyers. To do this, add a Condition block. In the variable picker, look for Order / Customer / numberOfOrders. Set the criteria to Equal to 1. This ensures that the workflow only proceeds if this specific order is the customer's very first purchase in your store's history.
| Condition Type | Requirement | Purpose |
|---|---|---|
| Customer Loyalty | First Order Only | Drive initial customer delight and retention. |
| Order Value | Over $50.00 | Protect margins on smaller orders. |
| Location | Domestic (US/CA) | Save on shipping costs for free items. |
Step 2: Staging the Order Edit with GraphQL
Use GraphQL mutations to begin the order editing process within your workflow.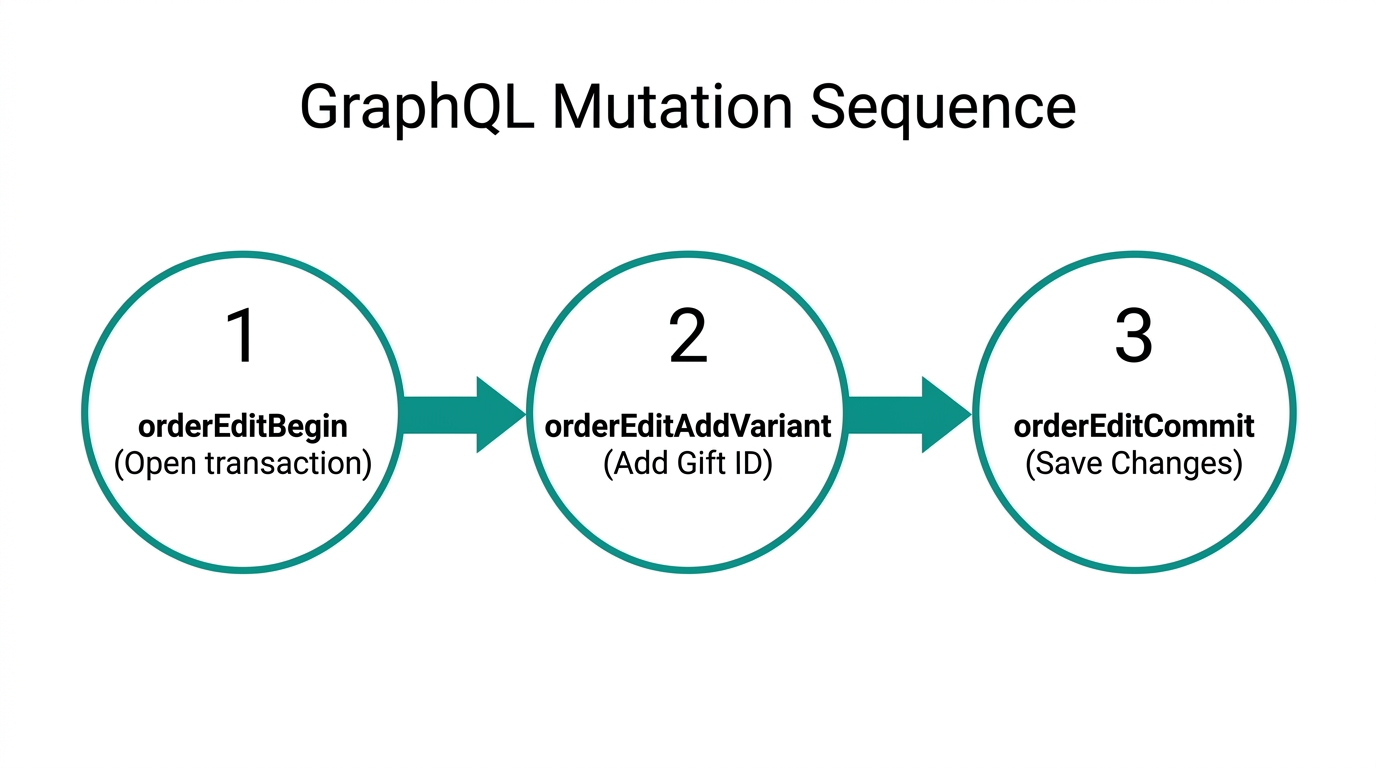
When the condition is met (True), we move to the Action. We aren't just adding a line item; we are performing a professional order edit. This requires a three-step API sequence: Begin, Add, and Commit.
Order Edit Begin
Add an action for Send Admin API Request. Choose the orderEditBegin mutation. You need to pass the orderId from the trigger. This step tells Shopify: "I am about to make several changes to this order; please give me a temporary 'calculated' order ID to work with."
By using this method, you avoid sending multiple notifications to the customer. They won't see three different emails for one gift; they will only see the final, updated order. This level of professional communication is exactly what Stormy AI maintains when drafting customer support replies or updates.
"Staging your edits via GraphQL is the difference between a glitchy customer experience and a premium brand feel."
Step 3: Adding the Gift and Applying the Discount
Now that the edit session is open, we need to add the product and ensure the price is zeroed out. Many merchants make the mistake of adding a product and forgetting the discount, which leads to a very confused customer being charged for their "free" gift.
Add the Variant
Add another Send Admin API Request action using orderEditAddVariant. For the orderId, use the calculated ID from the previous step. For the variantId, use the format: gid://shopify/ProductVariant/[YOUR_ID_HERE]. Note that the gid prefix is required for the GraphQL API to recognize the object.
Apply the 100% Discount
Next, use the orderEditAddLineItemDiscount mutation. You will need to target the lineItemId of the item you just added. Set the percentageValue to 100 and give it a description like "Welcome Gift." This ensures that when the customer looks at their updated invoice, they see exactly why the price is zero.
Step 4: Commissions Changes and Customer Notifications
Finalize your automation by committing the staged order edits to the Shopify backend.The final step is the most critical: Order Edit Commit. Until you run this mutation, all your changes are just sitting in a temporary "draft" state.
In this final API request, set notifyCustomer to true. In 2026, transparency is king. By setting this to true, Shopify will send the customer an updated order confirmation that includes their free gift. It’s a powerful psychological trigger—they’ve already bought, and suddenly they get a notification that they've been given something extra. This builds immediate brand equity.
While this runs, Stormy AI can monitor your Slack or Telegram to alert you if an API request fails, allowing you to manually fix any issues before the customer notices. Stormy can also pull these campaign results into a weekly performance report, comparing the retention rates of customers who received gifts versus those who didn't.
Testing and Debugging Your Automation
Never turn an automation live without testing it on a real (but small) order. Shopify Flow provides a detailed "Recent Runs" log. If something breaks, you can click into the specific run to see the exact data passed to the GraphQL API.
- Check if the Calculated Order ID was correctly passed between blocks.
- Verify that the Variant ID is prefixed correctly with
gid://shopify/. - Ensure your Inventory levels for the gift item are not set to "zero" (unless you allow overselling).
If you find that your gift inventory is consistently running low, you can ask Stormy AI to track the SKU and send a polite follow-up email to your supplier as soon as the stock hits a specific threshold.
"Debugging is where you learn how your store actually works. Don't fear the error log; use it to build a more resilient business."
Conclusion: The Power of Native Ops
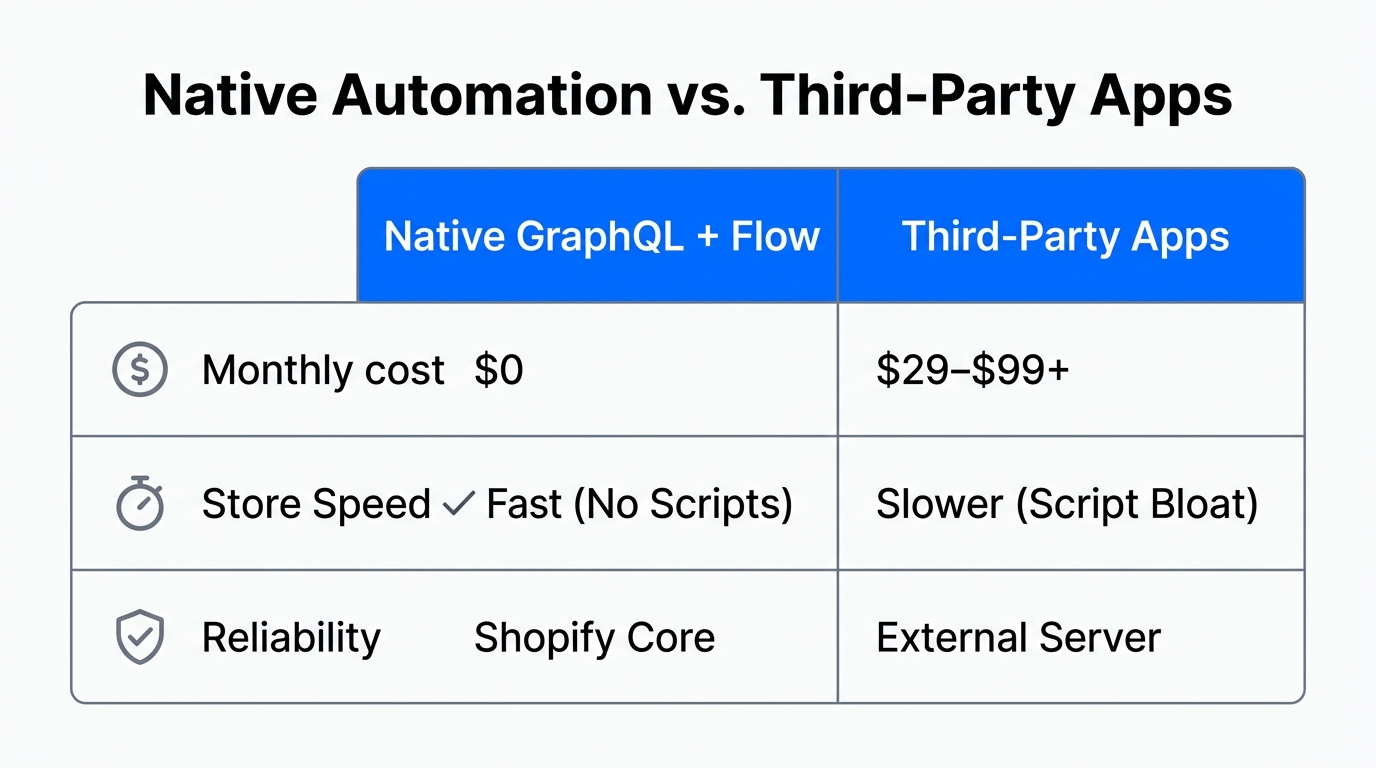
By the end of this tutorial, you have successfully replaced a $30–$50/month app with a native Shopify Flow workflow that is faster, more reliable, and fully customizable. This approach represents the future of ecommerce: lean, automated, and driven by data rather than third-party dependencies.
As you scale your store in 2026, remember that automation isn't just about "setting and forgetting." It is about freeing up your time to focus on product and community while an AI ecommerce employee like Stormy AI manages the messy back-office details. Whether it's monitoring your TikTok Ads performance or managing supplier deadlines, the goal is absolute operational excellence.
Ready to automate the rest of your back office? Explore how Stormy AI acts as your teammate to run the boring parts of your store, from inventory tracking to customer support triage.