2026 Playbook: Adding Shopify Products to Any Website with Buy Buttons and Web Components
Learn how to embed Shopify products into Webflow, Framer, or WordPress in 2026 using Buy Buttons and Web Components. Plus, how an AI employee manages the ops.
In 2026, the modern ecommerce brand is no longer tethered to a single storefront. Founders are finding that their customers live in diverse digital ecosystems—reading long-form articles on WordPress, scrolling through high-fidelity portfolios on Framer, or interacting with bespoke landing pages on Webflow. The challenge has always been the technical friction of moving products from a Shopify backend to these external sites without breaking the checkout experience or losing track of inventory. This guide breaks down the two most effective ways to turn any URL into a high-converting sales channel, and how an AI ecommerce employee like Stormy AI keeps the messy back-office operations running smoothly in the background.
The Two Paths to External Selling: Simplicity vs. Power
Learn about the two primary methods for selling Shopify products on external websites.
When you decide to sell your Shopify products outside of your native theme, you generally face a trade-off between speed and customization. For many founders, a quick "Add to Cart" button is enough. For others, a deeply integrated, branded experience that pulls real-time inventory data is non-negotiable. According to 2026 market trends, roughly 80% of real-world use cases can be solved by one of two official Shopify methods: the legacy Shopify Buy Button or the newer, more robust Storefront Web Components.
While these tools handle the frontend, managing the resulting complexity—like tracking inventory across five different landing pages or auditing the ROAS of ads pointing to these embeds—is where most stores fail. This is why many lean teams are now employing Stormy AI to act as a 24/7 teammate, pulling performance data from Meta Ads Manager and Google Ads to ensure these external buy buttons are actually profitable.
The Quick Win: Setting Up the Shopify Buy Button
A step-by-step walkthrough for configuring and implementing the classic Shopify Buy Button.The Shopify Buy Button is a free app maintained by Shopify that essentially creates a small, embeddable piece of your store that can live anywhere. It is the gold standard for speed and reliability.
Step 1: Install the Sales Channel
First, navigate to your Shopify admin and search the App Store for the Buy Button channel. Once installed, you will see a simplified dashboard with a single primary action: "Create a Buy Button."
Step 2: Select Your Product and Style
You can choose to embed a specific product or an entire collection. For example, if you are running a seasonal campaign for "Cinnamon Coffee," you would select that specific SKU. From here, you have three layout options:
- Basic: Just the button (ideal if you already have the product image and description on your site).
- Classic: Includes the image, title, and price.
- Full Product: A complete mini-product page with a detailed description.
Step 3: Customize Action and Code
In the 2026 version of the app, you can choose whether the button adds the item to a cart or redirects the user directly to the Shopify checkout. Once you hit "Next," Shopify generates a snippet of Javascript code. You simply copy this code and paste it into a "Code Embed" or "HTML" block on your platform of choice, such as WordPress or Webflow.
"The Buy Button is the 'easy button' for ecommerce; it takes less than two minutes to turn a blog post into a point of sale."
The Flexibility Play: Shopify Storefront Web Components
Explore the advanced flexibility of using Storefront Web Components for custom site layouts.If the Buy Button feels too restrictive, the Shopify Storefront Web Components are your next step. Traditionally, using the Shopify Storefront API required writing complex GraphQL queries. This was a massive barrier for non-technical founders. Web Components change this by providing a simplified templating language that looks like standard HTML.
How Web Components Work
Instead of fetching data via code, you use custom HTML tags like <shopify-data> and <shopify-money>. These tags act as placeholders that Shopify automatically fills with your store data. This allows you to build a completely custom layout. For instance, if you want the price to appear above the title, you simply swap the HTML tags in your code. This level of granular control is impossible with the standard Buy Button.
Connecting Your Store
To initialize the components, you wrap your HTML in a <shopify-store> element. This requires your specific store domain (e.g., your-brand.myshopify.com). You then use a <shopify-context> tag to tell the component which product it should be looking at by referencing the product "handle" found at the bottom of your Shopify product editor under the "Search engine listing" section.
While you are building these custom interfaces, Stormy AI can be monitoring your Shopify admin in the background. If a product handle changes or a variant goes out of stock, Stormy can alert you via Slack or update a central spreadsheet, ensuring your custom landing page never shows a "404" or an out-of-stock item to a live customer.
Unlocking Protected Data: Inventory and Access Tokens
Configure API permissions to access protected data like inventory levels for your components.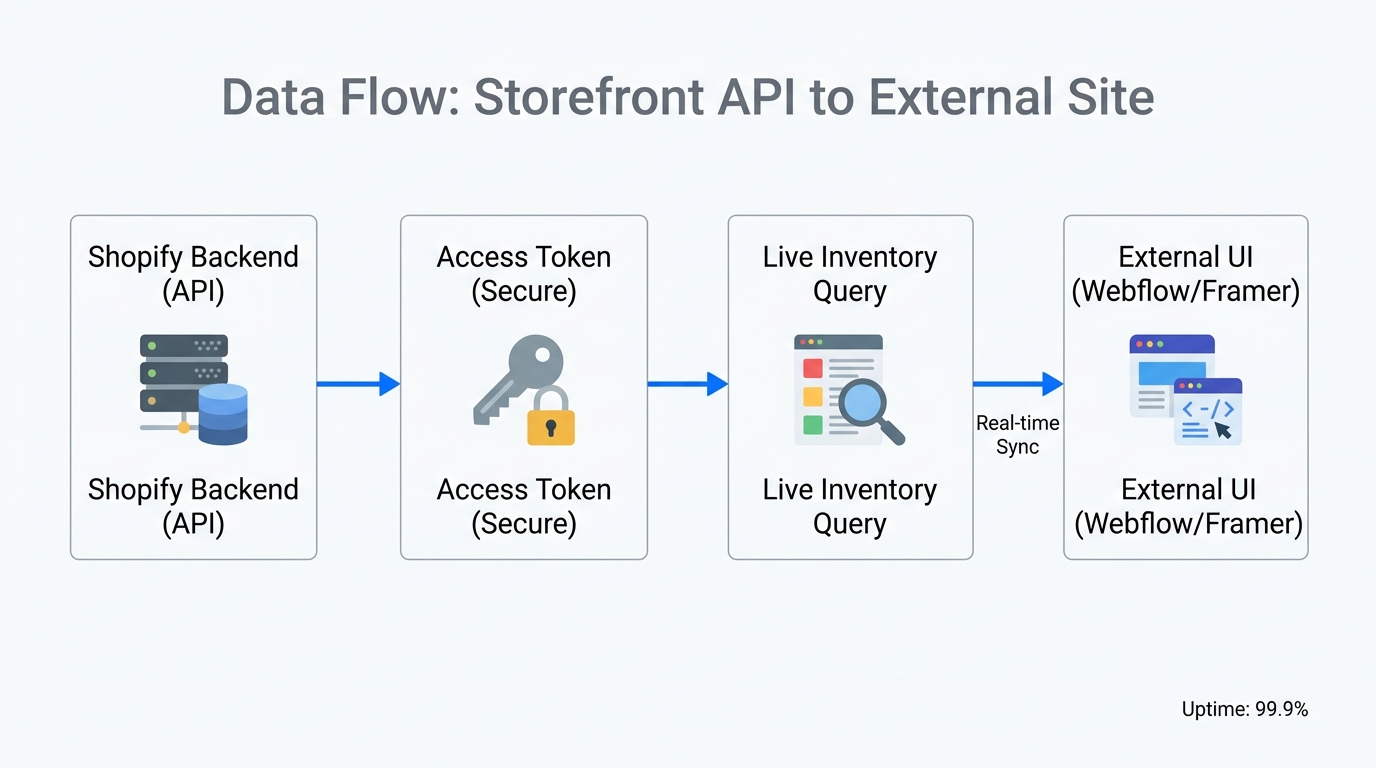
By default, public data like titles and prices are easy to display. However, if you want to show live inventory levels (e.g., "Only 5 items left!"), you need to use a Public Access Token for security. In 2026, this is managed through the Headless app in Shopify.
Step-by-Step Inventory Access:
- Install the Headless app from the Shopify App Store.
- Create a new "Storefront" within the app to generate a Public Access Token.
- In the API permissions, enable "unauthenticated_read_product_inventory."
- Add the
public-access-tokenattribute to your<shopify-store>HTML tag.
Once the token is added, you can use the data field product.totalInventory to display real-time stock counts. Managing these stock levels is critical; an AI employee like Stormy AI can track these numbers across your external embeds and automatically trigger follow-up emails to your suppliers when the count drops below a specific threshold, preventing the dreaded "Sold Out" banner on your best-performing landing pages.
Comparison: Buy Button vs. Web Components
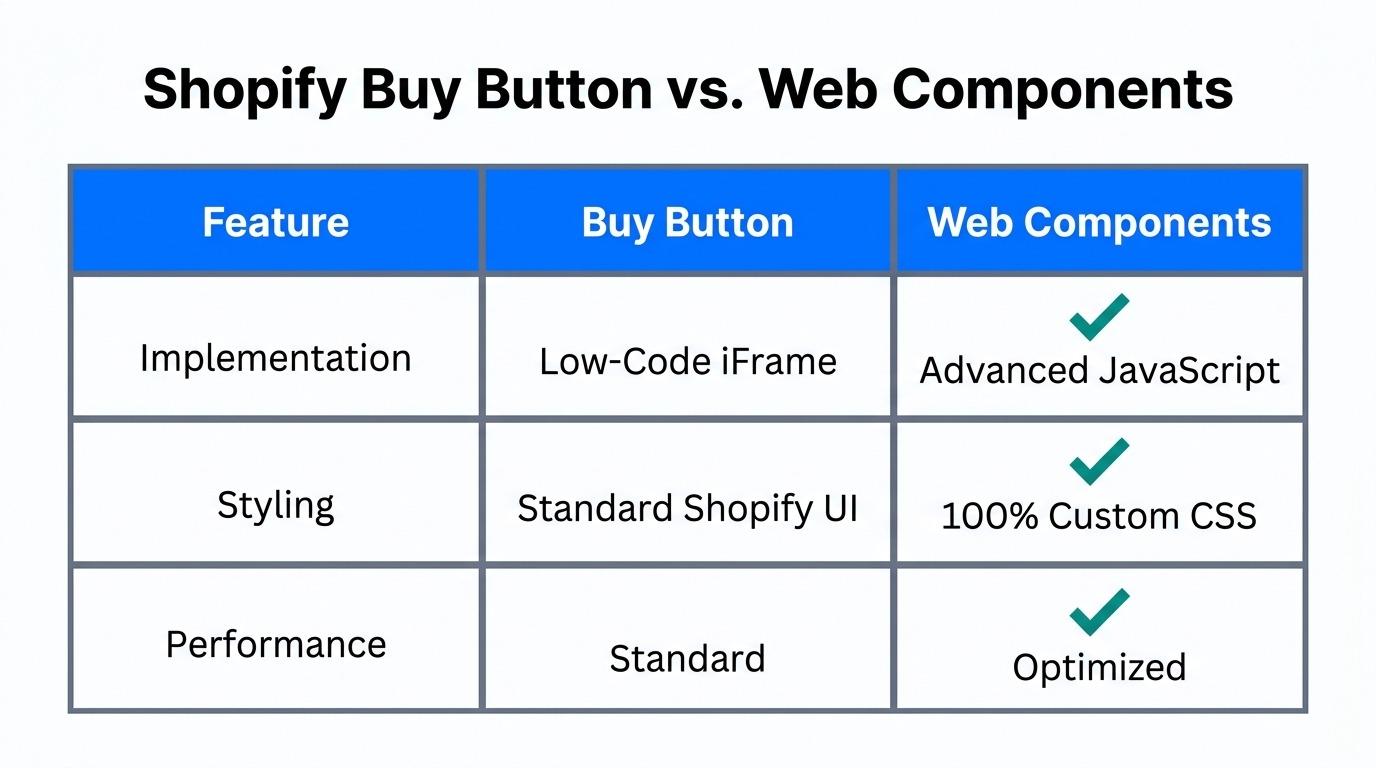
Choosing the right tool depends on your technical comfort and design requirements. Use the table below to determine which path fits your 2026 growth strategy.
| Feature | Shopify Buy Button | Storefront Web Components |
|---|---|---|
| Setup Time | < 5 Minutes | 30 - 60 Minutes |
| Coding Skill | Zero (Copy/Paste) | Basic HTML/CSS |
| Customization | Limited to Presets | Unlimited Layout Control |
| Dynamic Data | Price/Title Only | Inventory, Metadata, etc. |
| Best For | Bloggers & Simple Landers | Designers & Headless Sites |
Managing the Back Office with Stormy AI
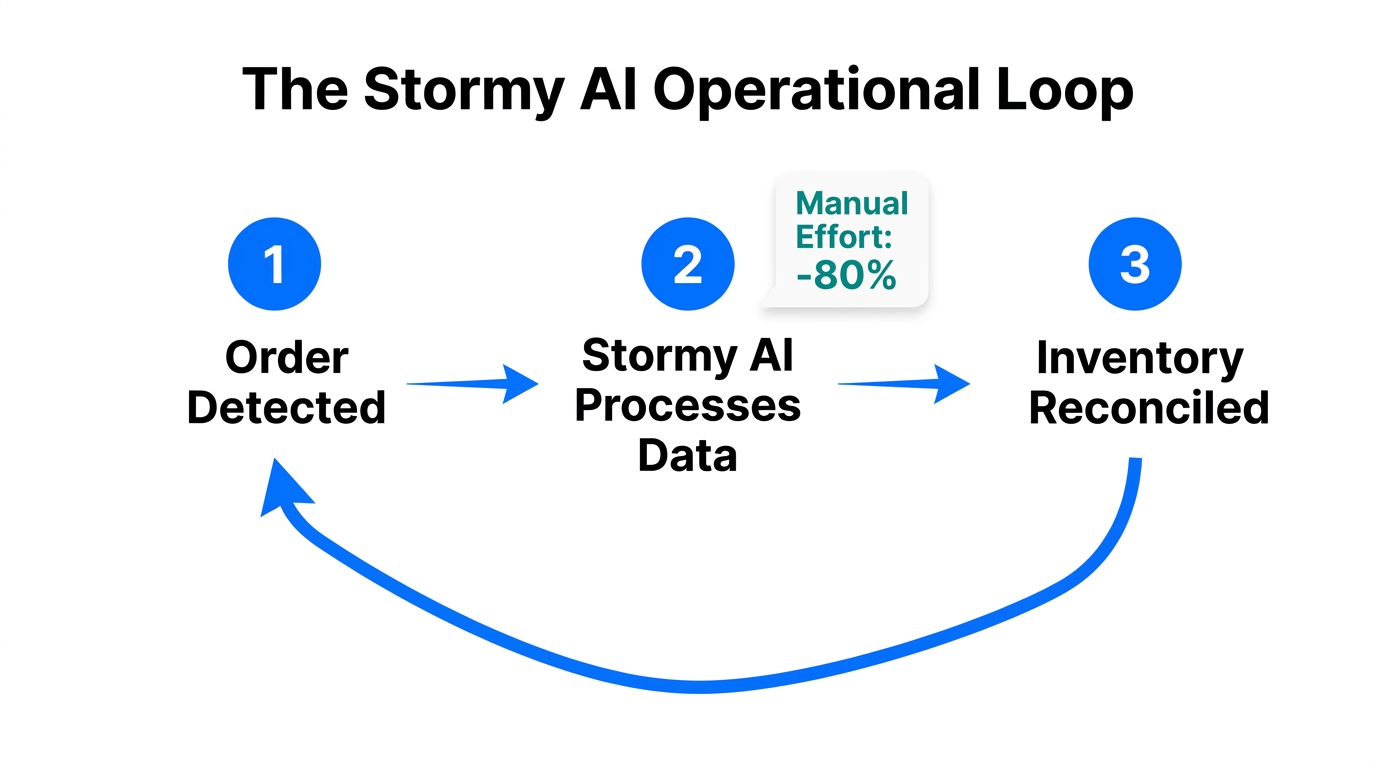
Deploying products across multiple websites creates a "data silo" problem. How do you know which site is driving the most refunds? How do you keep track of customer support tickets coming from five different domains? This is exactly why Stormy AI exists. It acts as an autonomous AI ecommerce employee that sits on top of your stack.
When you embed a product on a new WordPress site, you can ask Stormy to:
- Monitor Performance: Pull data from TikTok Ads Manager and match it against Shopify sales attributed to that specific external URL.
- Automate Support: Triage incoming emails from customers who bought via the embed, using Gorgias or Zendesk to draft replies and handle refund requests.
- Update Spreadsheets: Keep a living Stormy AI spreadsheet updated with daily ROAS and inventory levels across every channel you've added a buy button to.
"Scaling to multiple platforms shouldn't mean scaling your manual workload. Stormy AI handles the busywork so founders can focus on the brand."
Best Practices for Seamless Checkout
The biggest risk with external embeds is the checkout handoff. If the transition from your Webflow site to the Shopify checkout feels jarring, conversion rates will plummet. In 2026, follow these three rules to ensure a smooth experience:
1. Use a Custom Domain for Shopify
Ensure your Shopify store is hosted on a subdomain of your main site (e.g., shop.yourbrand.com). This keeps the browser from flagging the checkout as a third-party redirect and builds trust with the user.
2. Match Branding Exactly
If you use Web Components, use the same fonts and hex codes from your Figma designs. The Buy Button should also be customized within the app to match your primary call-to-action colors.
3. Implement Cross-Domain Tracking
Use Google Analytics 4 or a dedicated tool like Triple Whale to ensure that a click on your Framer site is correctly attributed to the final sale on Shopify. This is non-negotiable for scaling ads.
Conclusion: The Future of Distributed Ecommerce
The era of the "siloed" online store is over. By 2026, successful brands are using the Shopify Buy Button for quick experiments and Storefront Web Components for high-performance, custom-designed shopping experiences. Whether you are building on Webflow, Framer, or WordPress, the tools to sell anywhere are now more accessible than ever.
But remember: visibility creates complexity. As you expand your reach, don't let the back-office tasks of inventory management, supplier follow-ups, and ad auditing slow you down. Hire Stormy AI as your AI ecommerce employee to watch the messy parts of your business while you focus on building the next great brand. Ready to automate your operations? Explore how Stormy AI can run your store's back office today.